Ready to crank up the heat on your next mix? Then you’ll need to know about audio panning.
The true test of a great track is one that’s got depth, space and clarity. Audio panning allows music producers to achieve all three, whilst unlocking a wider range of audio mixing techniques and possibilities in the process. And don’t be deterred - once you understand how different audio panning techniques work, you’ll find it’s actually pretty simple to do! And trust us when we say - the end results will make it worth it.
What is audio panning?
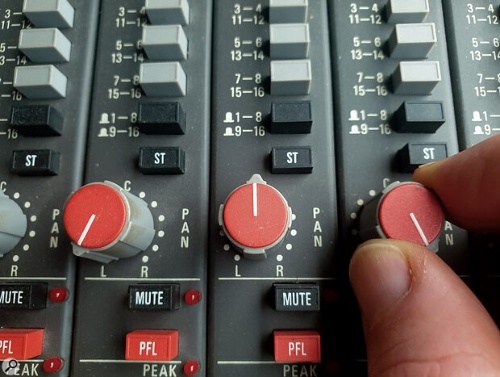
Panning describes the process of placing a sound to the left or right side of the stereo image. This is made by decreasing either the left signal level (pan right) or the right signal level (pan left). In most DAW’s, panning can be achieved using a ‘pan slider’, which you can often find in your mixer.
Why should I use audio panning?
You should use panning to create movement and width within your music, both which’ll help catch the listener's attention. Apart from that, panning makes sure your elements each have a place in the stereo image, which results in more audio clarity.
Here’s some good rules of thumb to use when deciding whether to use panning:
- Is the element you want to pan one of your main elements i.e. the one that should stand out the most?
- Is the element you want to pan one of your groove leading elements?
- Is the element you want to pan a core part of your track’s bass foundation?
If you can answer one of these questions with yes, you shouldn’t pan the sound.
Why?
Elements like main leads, main vocals, snares and kickdrums are often very important elements in your overall track. This means they should be kept in mono or gently stereo.
3 types of audio panning to improve your mix
1. Drum Panning
The first panning technique I’ll give you is very simple. It’s about all possible drum (percussive) elements you could use, such as kick drum, claps, snares, hihats open & closed, rim shots, toms and more.
Imagine you sit in front of an acoustic drum kit.
In the centre of your seating position, you will find the kick drum. As we already said above, the kick drum is a leading element for your groove, so keep it in mono. Close to the kick drum, you will find the snare. It doesn’t have to be completely mono, but shouldn’t be panned much because it’s very close to the centre.
In contrast, the hihat (often on the left) and the crash (often on the right side of the kick drum) have more distance to the kick drum, so they can be panned more.
What do we learn from this?
That our ears often hear sound in a panned context. So why not pan sounds in the DAW like we’re used to hearing them? That will sound more natural to us.
2. Vocal Panning
The following panning technique is made for vocal doubles, not for the main vocal.
So, what do we need?
Imagine you recorded the hook of a new rap track with an artist. Both of you are satisfied with the take. Now record the same part even two times more, so that when you are finished, you’ve got three audio stems of the same part (in this case, the hook).
This is how it can look after:
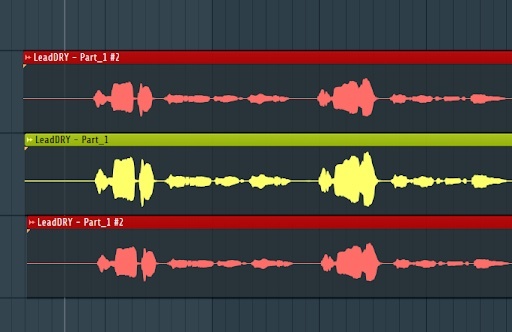
They don’t have to be perfect, but they should be nearly the same.
So, now we’ve got two doubles (red) and the main vocal (yellow). If you route all three to different mixer tracks, you can pan one of the doubles to the right (around 25 to 50%) and one to the left (the same amount as you did before on the other side).
Remember to keep the main vocal mono. Then lower the volume of the doubles and EQ them so their frequency spectrum is thinner. Mixed with the main vocal, this leads to a thicker sound, which is especially desirable for most hooks. You can follow the same vocal mixing techniques for adlibs.
3. Auto Panning
This third technique is all about auto panning.
What is that?
The term is made up of two words - ‘automatic’ and ‘panning.’ So, it’s about an element which gets panned automatically.
This often happens with an LFO, which means your panning fader will get automated over time with a speed and amount (intensity) value. The amount will decide how much the sound will get panned (from 100% left to 100% right or only from 20% left to 20% right). The speed knob will determine how long it will take the signal to swap from left to right.
Sounds good! But unsure why you should use it and where? Let me show an example.
Let’s say we are editing the hihat of a rap track. To make it more interesting and to add movement, we open an autopan effect on its mixer channel. If you are an FL Studio user, you can use the stock plugin “Fruity Panomatic” for this. If not, you can use the free plugin Pancake by Cableguys. Now you’ll be able to set up the speed and amount of panning automation and we’re done! Easy and effective as it sounds. And feel free to get creative with it.
Author Bio
Hey, I am Marlon and I am the founder of the Producer Academy on Instagram, a learning platform for music producers like this one from Ditto. If you want daily music production tips and a personal teacher who answers your questions (for free) and you liked this post, visit me on Instagram

Join the conversation