
How to Promote Music on Twitch (and Earn Money)
It’s surprising how many artists release music on Spotify and other stores, but overlook Twitch as a platform to promote, showcase and sell their music.
So let’s discuss how you can get set up and leverage the platform to grow your fanbase worldwide. If you want to skip forward, just hit one of the links below to jump to that section.
How to stream & promote live music on Twitch
Sign up & get started
If you’re new to Twitch, you’ll need to head to twitch.tv and create an account.
Once you’ve signed up, head to your Settings to upload a profile picture and biography. You’ll also want to use your Channel page to add other details to your profile, including links to your music, merchandise and more.
Check out our post on best image sizes for the recommended dimensions to use for your Twitch profile picture & banner image.

The more complete your profile is the better! Make sure to include all your most important info and links so your fans can easily discover more about your music.
Get the right gear
A high quality stream and performance makes all the difference when it comes to retaining viewers and winning over new fans.
Go live with the wrong gear and people will quickly tune out. But what gear should you get? Well that depends on your budget.
Sound
Sound is obviously key for musicians streaming live on Twitch. It’s worth investing in a high quality mic and USB interface so you can plug directly into the platform.
Cardioid mics are great for picking up the sound directly in front of them, but not so good at catching noise further away.
Condenser mics work well for picking up multiple sound points (ideal if you’re performing with a friend or band mate) but also tend to pick up more background noise.
TIP: Some microphones are created specifically for streaming and have their own USB output. Alternatively you could buy a USB interface to bridge the gap.
Video
A high quality video stream helps you come across more professional and legitimately. You can buy a reasonably cheap USB camera, or hook up a more professional camera using a USB interface.
It all depends on your budget and access to equipment.
Lighting
Make sure everyone can see a clear picture by hooking up some lighting before you go live. You can pick up some basic lighting for a reasonable price.
Ring lights are particularly popular with streamers, so shop around to find one in your price range.
Before going live
So you’ve got the right gear and you're ready to go live? Here are a few key things to remember before you start streaming.
Broadcast length
Most Twitch streams don’t reach their top viewers numbers until around 20 minutes, so you want to make sure your broadcast is well over this time length.
It’s recommended that you stream for at least 2 hours at a time. This gives you plenty of chances to hit your maximum possible audience size. If you’re performing live on Twitch, save your best stuff for around 30 minutes when your viewer numbers start to hit their peak.
TIP: The average Twitch user views around 106 minutes of broadcasts per day.
Check your connection
This is pretty obvious, but make sure you have a solid, stable internet connection.
Twitch recommends an upload speed of at least 5Mbsp, so plug directly into your router if possible as wi-fi can be much less reliable.
Enable AutoMod
If you’re worried about trolls in your stream or just want some help moderating your comments, you can enable Twitch’s AutoMod feature.
AutoMod can filter out specific words from your chat and has a number of settings levels depending on your preference.
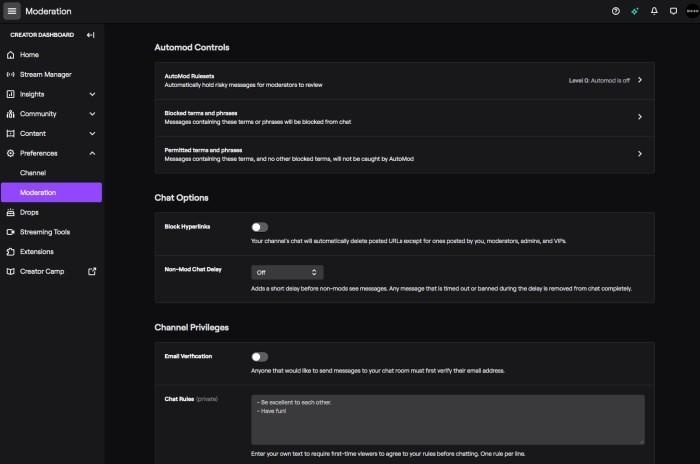
TIP: To set up AutoMod & other moderation options, go to your Twitch dashboard and hit Preferences followed by Moderation.
Adjust your lighting
Make sure your lighting setup gives off the right aesthetic.
Viewers will want to see you clearly so avoid dimly lit spaces. Twitch is all about engaging with your audience, so don’t hide away - step into the spotlight!
Choose your categories
Before you go live you can choose ‘categories’ for your stream, which helps viewers find the kind of content they’re looking for more easily. Choose the categories that suit your stream to make sure you’re discovered by the right people.
TIP: Two Twitch categories often used by musicians on Twitch are ‘Music & Performing Arts’ and ‘Just Chatting’.
No background noise
Find a space where background noise won’t be an issue.
You might not notice the sound of cars going past anymore, but your audience will. Make sure you’re away from any noises that could interrupt your stream and mess up your flow.
Performing live music on Twitch
There are loads of ways to interact with your existing and potential fans on Twitch, beyond simply playing your live set like you would at a normal show.
If you’re a musician on Twitch, here are some ideas to get you started.
Your live streams could include one or all of this content over a 2 hour broadcast. Get to know what your fans want on top of your live set to make sure they stick around for more.
Growing your fanbase on Twitch
Let’s discuss some of the ways to grow your fanbase through Twitch, bring more viewers to your broadcasts and ultimately convert them into fans.
We’ll skip past the obvious stuff here. We'll assume you know how to promote yourself on social media, reach fans with email marketing and other channels to make people aware of your Twitch streams.
If not, hit this link to learn more about the basics of promoting music independently.
Make a plan & stick to it
Consistency is so important when it comes to streaming on Twitch. Set a streaming schedule and stick to it, so you viewers will know exactly when to find you online.
You might choose to stream for 2-4 hours once or twice a week (or more if your viewers demand it!). Try to keep these broadcasts on a regular schedule. That way, your fans can just tune into Twitch on a particular day and time each week and know they’ll find you online.
Turn viewers into followers
Encourage everyone viewing and commenting on your Twitch stream to follow you.
There’s no point being passive here. When your viewer numbers hit a peak, ask everyone directly to hit that follow button.
Interact with the chat
Twitch is all about community and hanging out with your audience, so make sure you reply to comments and encourage people to message you in the chat.
Remember you can use AutoMod and other moderation settings to control the type of chat comments you’ll receive if you’re concerned about trolls.
Take requests
An easy and effective way to interact with your viewers is to take requests and do covers!
Ask your viewers to comment their favourite song in the chat or give them a choice of songs you know how to play live. Fans who feels like they’ve truly contributed to your broadcast are more likely to come back for the next one.
Create a Highlights reel
Once a Twitch broadcast is over you can select certain clips or screenshots from your stream to create a Highlights video.
You can then use this to promote your Twitch elsewhere, thank your fans for tuning in and let everyone know when you’re next online.
You can learn more about creating Highlight videos on Twitch here.
“Raid” with other streamers
Making friends and collaborating with other Twitch streamers can help boost your profile and get an introduction to each other's audience.
One great way to collab is to “hand off” your viewers to another streamer's broadcast when you’ve finished yours. This is known as using “Raid”.
You can use raid to help out other music streamers, make friends, and then get them to help you in return. Everybody wins!
TIP: To hand off your viewers to other streamers, just type /raid in your chat, followed by the channel name you want to hand off to.
Connect with Amazon Music
You can also integrate your Twitch channel with Amazon Music. This means that anyone who uses Amazon Music can view your broadcasts through the Amazon app, as well as Twitch.
It’s easy to set up too. Just sign up for Amazon’s music analytics platforms Amazon Music for Artists to get started. Plus, when you do, you’ll get verified on Amazon in the process.
Learn more about integrating Twitch through Amazon Music for Artists here.
Monetize your music on Twitch
Monetize straight away
When you first start out on Twitch, monetization might not be at the top of your priority list. It’s best to approach Twitch as a promotional tool at the start of your journey.
Having said that, there are plenty of ways to turn Twitch into a revenue stream from day one.
You can drop links to your merch store from your channel page, or create a link via which fans can “tip” you directly during your broadcasts.
At first, the only way to ask for cash tips is to set up a payment link using PayPal, Venmo, CashApp, Bitcoin or similar and drop the link directly in your chat during your stream.
Use Twitch Bits
‘Bits’ (also known as cheering) is the official digital currency of Twitch, but you need to become a Twitch Affiliate or Partner to access them.
Bits are purchased directly from Twitch using real money via Amazon Payments. Twitch streamers get $1 for every 100 bits contributed during their broadcast.
Twitch Affiliate status is only available to certain streamers though. Here are the requirements to become an affiliate and start accepting Bits from fans.
Do you stream live music on Twitch? Got any other tips we might have missed here? Let us know in the comments below!
How to Promote Music on Twitch (and Earn Money)
.svg)

