
How to Detect Resonances When Mixing Music

Resonances, or frequency build-ups, are one of the most common issues you'll face when mixing music. They can make certain instruments or frequencies stand out in your mix, making it sound harsh and unbalanced.
However, it can be tricky to track down exactly which frequencies are causing problems, and even harder to eliminate the problem without making your tracks sound weak and thin—especially when using a conventional EQ.
Thankfully, with the right tools, detecting and eliminating resonances can be a breeze. In this blog, you'll learn how RESO can help you detect and correct frequency resonances quicker and easier than ever. But first, let's start by breaking down the basics.
What is resonance in music?
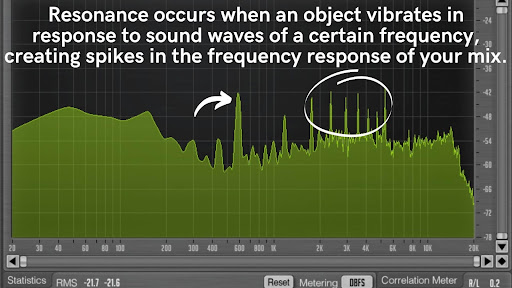
Resonance occurs when an object, such as an instrument, speaker cabinet, or even your room, vibrates in response to sound waves of a certain frequency. While resonance can be a good thing that enriches your sound, like when the body of an acoustic guitar starts to "sing" as the strings are tuned, it can also have a negative impact on your sound, like room modes that make certain frequencies stick out in your listening environment.
Resonance is typically caused by imperfections in instruments, recording equipment, and even recording environments. Resonance can also occur digitally when one or more sound waves with the same frequency response combine—kind of like how doubling a vocal track increases the amplitude but also alters the tone.
Resonance can make certain tracks or even specific notes stick out in your mix, which can lead to your whole mix sounding harsh and unbalanced. That's why it's important to identify and eliminate unwanted resonance early on in the mixing stage.
How To Detect Resonances When Mixing: The Hard Way
It's possible to manually detect and eliminate resonance in your mix using a process known as the "frequency sweeping method," but this typically requires a highly trained ear and a surgical EQ plug-in.
Start by selecting a highly-transparent EQ with variable frequency and Q controls, as well as a frequency analyzer to help you visualize problem areas. Insert these plug-ins as the last two plug-ins on the channel you want to EQ.
Next, grab a band on your EQ and increase the Q as high as it will go, creating a sharp, narrow point. Turn up the gain a fair amount (at least 12 dB, but you can go as high as the plug-in will allow) and start scanning through the frequency range where you suspect the resonance is occurring.
Keep an eye on your analyzer for spikes in the frequency response, and listen closely for frequencies that stick out. When you sweep over a resonant frequency, it will sound significantly louder than the surrounding frequencies and have a harsh, abrasive tone.
Once you identify a resonant frequency, reduce the gain of the EQ band as needed and slowly increase the Q until you've eliminated the resonance. Unfortunately, this can be very tricky to achieve with a traditional EQ. Too subtle of a cut might not eliminate the resonance entirely, while too aggressive of a cut can gut your track, resulting in a weak and thin-sounding mix.
One solution is to use a dynamic multi-band EQ or compressor, which will only reduce the resonant frequency when it becomes excessive in the mix. This prevents resonance in the mix but also ensures your mix doesn't sound thin. However, multi-band plug-ins are often expensive and complicated to use. Thankfully, dynamic resonance plug-ins like RESO offer the best of both worlds: a simple, easy-to-use interface with powerful dynamics processing under the hood.

How To Detect Resonances When Mixing: The Easy Way
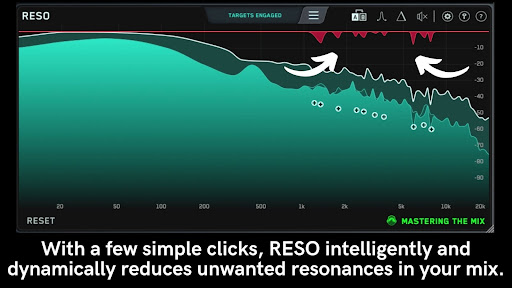
RESO is a dynamic resonance suppressor that intelligently reduces unwanted resonances in your mix. With a few simple clicks, RESO automatically analyzes your audio for the most resonant frequencies, then generates "Target Nodes" to show you exactly how much gain reduction is needed to reduce the resonance.
RESO uses mastering-grade filters to transparently reduce resonance in a dynamic way, ensuring your mix sounds rich, full and resonance-free. RESO shows you exactly how much reduction is needed to solve the problem without gutting your tracks. Each node utilizes Automatic Q optimization for the best possible results, making RESO the fastest and most effective way to fix resonance issues on any channel of your mix.
Typically, it's best to start by analyzing your master bus to identify any broad frequency issues with your mix. Insert RESO as the last plug-in on your master bus and press play. Check the center window for real-time visual feedback on the frequency response of your mix to help identify problem areas.
Click "Calculate Target" at the top of the display to analyze the most resonant frequencies in your mix. RESO will automatically create "Target Nodes" showing how much gain reduction is needed to transparently eliminate the resonance. Next, click "Engage Targets" to initiate all of the targets at the suggested levels and automatically begin reducing resonant frequencies.
Keep in mind, this is just a starting point. You can individually adjust each target for greater control, including frequency, gain reduction and Q shape.
There are three ways to adjust nodes:
- Nodes can be moved freely around the frequency spectrum by clicking and dragging.
- Holding the Control key while clicking and dragging nodes allows you to retain the same frequency positioning while adjusting the amount of gain reduction.
- Holding the Shift key while clicking and dragging nodes allows you to retain the same amount of gain reduction while sweeping for the right frequency.
You can also create and place nodes manually just by clicking on the display window. New nodes are automatically engaged and the Q settings are optimized based on the selected frequency. As you move the nodes throughout the frequency range, the Q settings are automatically updated, making it easy to quickly and transparently reduce resonance.
Nodes placed towards the left of the display, which affect lower frequencies, will have wider Q values for a more natural sound. Nodes placed towards the right of the display, which affect higher frequencies, will have a more narrow Q to accurately hone in on problem frequencies.
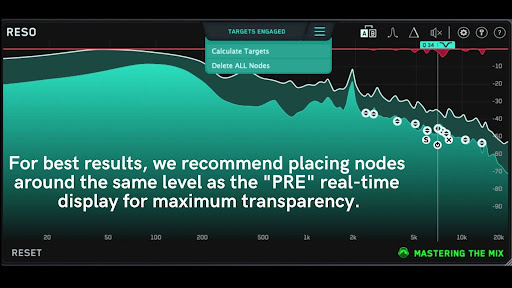
RESO also offers an impressive real-time frequency analyzer for visual feedback. By default, the display shows Pre, Post and Max peaks across the entire frequency spectrum to help you zero in on problem areas.
For best results, we recommend placing nodes around the same level as the "PRE" real-time display for maximum transparency, then dragging the node down for a more noticeable reduction. Any time the signal exceeds this level, RESO will automatically reduce the selected frequency, ensuring a clean, smooth-sounding mix.
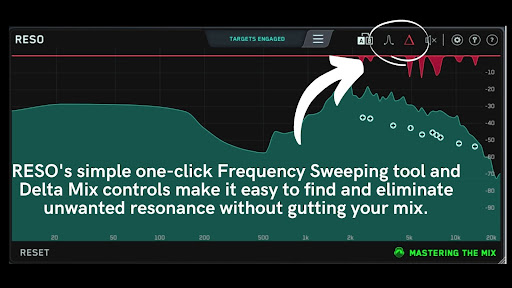
For those who prefer to manually pinpoint resonance, RESO makes it easy to pick out disproportionally resonant frequencies with a simple one-click frequency sweeping tool that solos each node to help you hone in on problem areas of your mix. Just click the Frequency Sweep button and drag your mouse across the display to sweep each frequency range for issues.
It's important to note that most frequencies will likely sound unpleasant in this mode, but it can be a powerful tool for identifying the frequencies that are causing the biggest problems in your mix.
As always, it's important to be careful that you don't overcorrect and remove too much of the resonant frequencies in your mix. Toggle the bypass button on and off to make sure your mix sounds better when RESO is engaged. If you're still not happy with the results, use the A/B button to test out some slightly different settings. This can be especially helpful when your mix is sounding better, but still "not quite right."
Another great method for making sure you're not cutting out any important frequencies from your mix is to use the Delta button to monitor what you're subtracting from the mix. When listening to the Delta mix, you should only hear the harsh and brittle frequencies you want to cut out. If you're able to clearly make out large portions of the song, try backing off on the gain reduction a bit.
Now that you know how to use RESO, removing resonance from your mixes will be a breeze!
.svg)

